How to add icon & image
To add an icon to a page or a popup, select the icon option from the layout section, link to “font-awesome” website is provided for an icon name click on that it will open the new tab, you can copy the name of that icon and paste it under the icon name.
Backoffice: Page & Popup
![]()

Fronend: Page & Popup

To add an image to a page or a popup, select the image option from the layout section, and click on choose file to upload an image (.png, .svg, .jpg).
Backoffice: Page & Popup

![]()
Frontend: Page & Popup

You can choose different images for the English and French languages so when the patient with these languages login, they will see the page image accordingly.
Backoffice:

Frontend:


How to add connection page settings
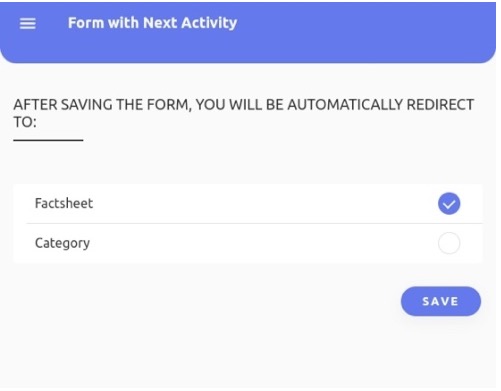
The connection page setting is used to link the pages. You can add the connection to the following page and the previous page. An example of how to add a condition for the factsheet is explained:
Step 1: Click on CREATE button which will open the connection page settings

Step 2: From page is the current ePRO page (Form with next activity), To is the destination ePRO page which you want to link, in this scenario select the factsheet from the dropdown.

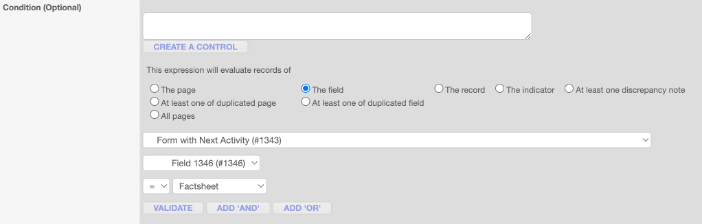
Step 3: From Condition (Optional) click on CREATE A CONTROL button, Select The field option, From in the page dropdown select “Form with next activity (#1343)”, Select “Field 1346 (#1346)” from the dropdown, Select Factsheet, Click on VALIDATE and SUBMIT
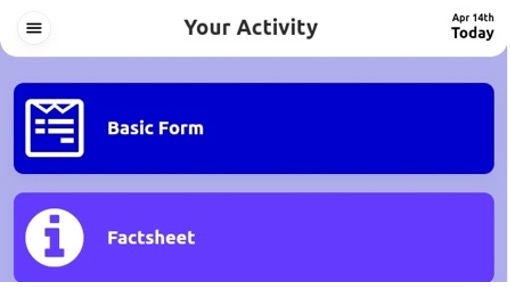
This means a condition has been created for a factsheet field which is on Form with next activity page when a patient clicks on the factsheet field it will open the factsheet page and when the previous button of the factsheet is clicked it will navigate back to the Form with next activity page.

Likewise, you can add conditions for the pages, fields, and records.