In the system, each field depends on a chapter.
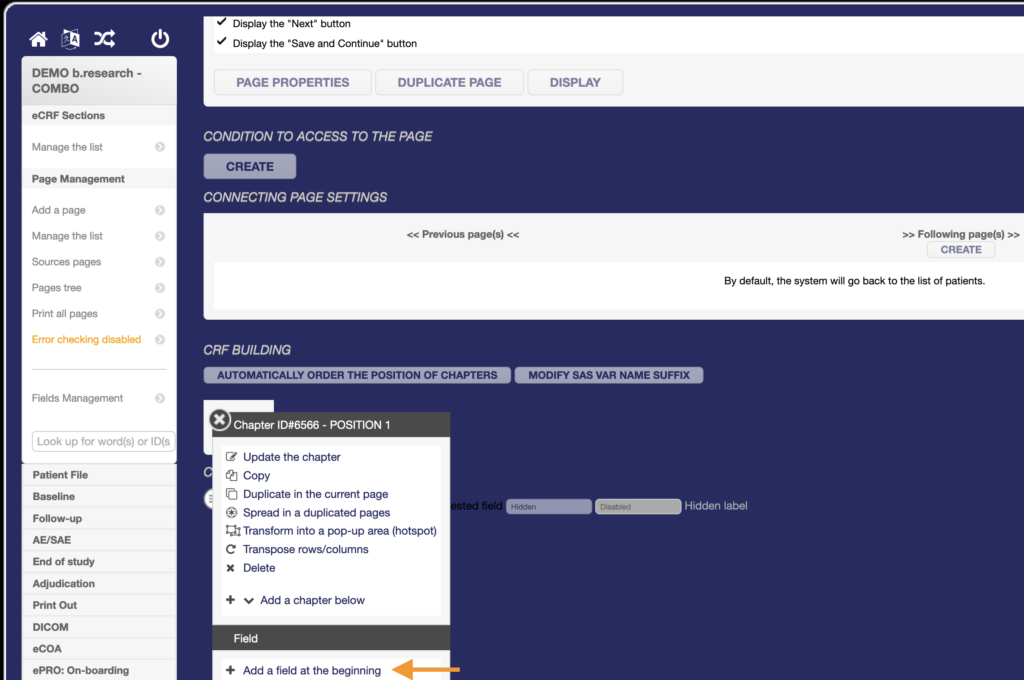
Once the chapter has been created, you can add a field by clicking on the Chapter Burger button and on Add a Field at the beginning.
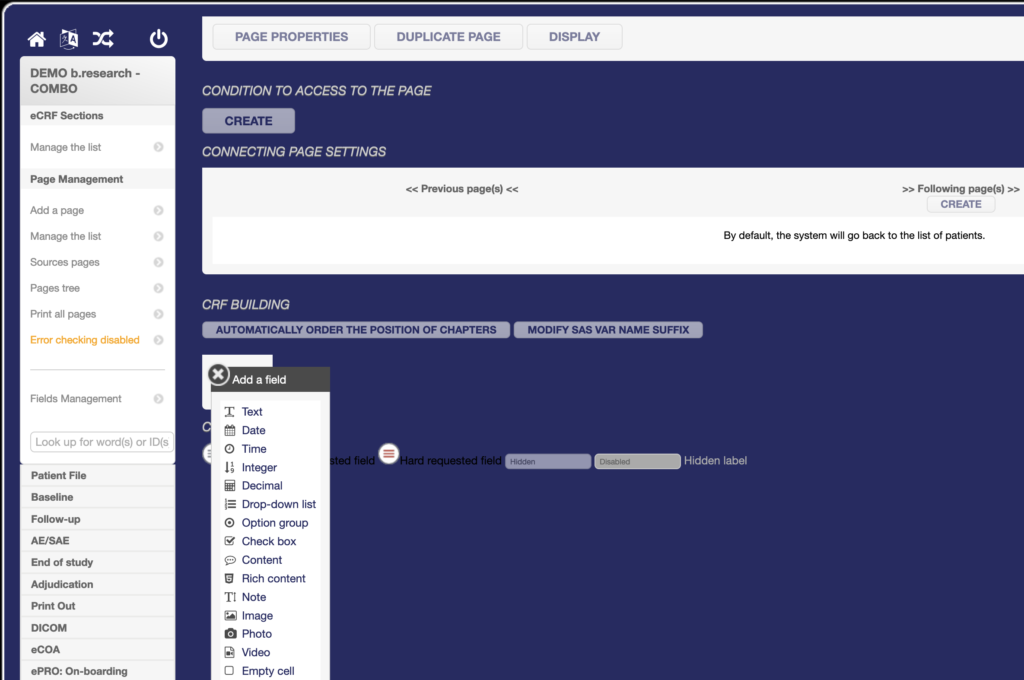
You can then select the desired field from the list of available field types.
You are automatically redirected to the field properties when you add it. You can also access the field’s properties by clicking on its ID or by clicking on « Edit field » via the field’s burger button.
GENERAL part

You can start by redefining the field type if an error was made during the initial selection. Note that if you change the field type, all parameters (including the label) are emptied (1).
Then, you can define the field label. For some projects, several languages may be activated. In this case, for each label, you’ll find several boxes to add the translation. Each language box is associated with the country flag. Below, the first box corresponds to English, and the second to French (2).
You can also change the position of the field within the chapter. Chapters work like Excel sheets, with fields placed in a cell at the intersection of a column and a row. Here, the field will be placed at the intersection of column 1 and row 1 of the FIRST CHAPTER (3).
If the field is to be moved to a new chapter, either on the current page or in another one, you can select the chapter from the drop-down list after clicking on Click here to update (4).
Finally, if the field is on a page duplicated from a source page, then this field must be linked to the source field. By ticking the checkbox, you can choose the source field to link it to (5).
It is possible to modify the type of certain fields already created if the two types are in the same category.
For example, you can transform an integer field into a decimal field (numeric fields category), or an option group field into a drop-down list (single-selection fields category).
However, changing the type of a field may induce changes in the event handler part.
Therefore, an in-depth impact analysis is necessary before any changes are made.
FIELD VALUE part
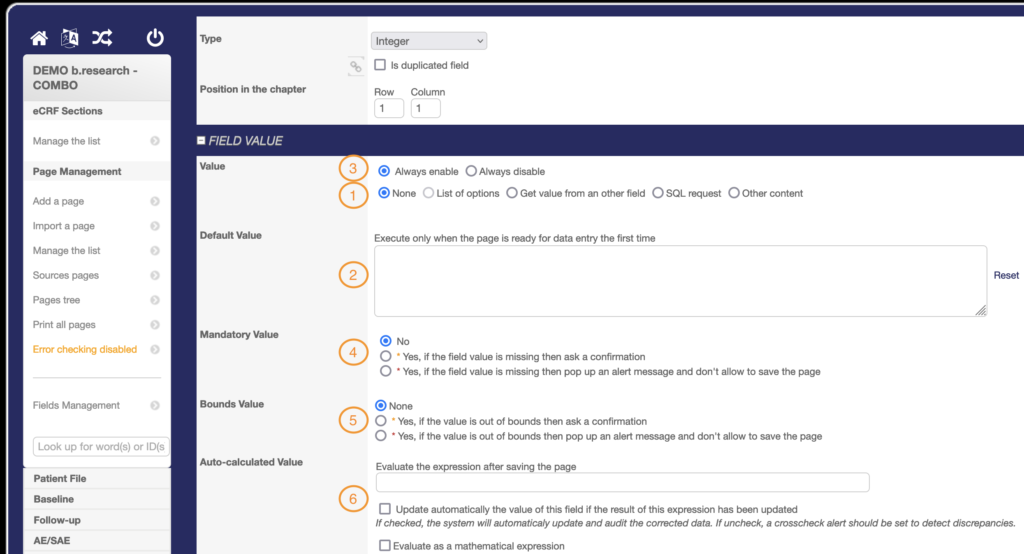
You can define the value properties of the field according to its type.
Value (1)
Here, you can pre-define the field value.
« None » is always pre-selected for single-value fields such as integers, decimals, dates, text, and notes, to allow users to enter any value in the front office (FO).
“List of options” is always pre-selected for multiple-choice value fields such as drop-down lists or option groups, to allow users to select a value from the list proposed in FO.
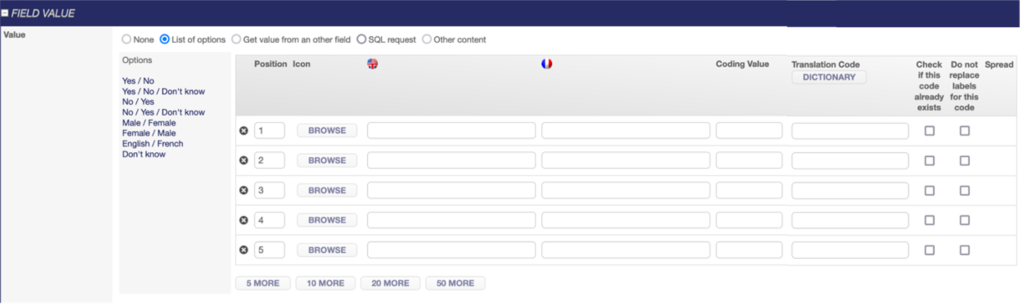
In the “List of options”, you have several parameters to define, the first of which is the number of values required in the list. By default, the system displays 5 values to set, but you can add 5, 10, 20, or 50 by clicking on the buttons below the list.
Once you have the right number of values, you must define the values label according to the languages available and the Coding Values. When adding labels to a value, the translation code is automatically generated but can be modified by one of the standard codes available in the Options on the left of the list.
For example, if the option group values are Yes (EN) / Oui (FR) and No (EN) / Non (FR), the standard translation code to use is “Yes / No”. When you click on it, the translation code is automatically added.
You can also adjust the position of values in the list by changing the position number.
You can add an image to the value or replace it by clicking BROWSE.
Finally, you can reset a value by clicking on the black cross on the left.
“Get value from another field” can be used to set a value callback in a Content, Text, Note, Date, Integer, or Decimal field, depending on the purpose of the callback.
If the callback is only dedicated to displaying information, with no need for export, a Content field should always be used.
If the callback is dedicated to performing a calculation, an input field (Integer, Decimal, or Date) equivalent to the original field must always be used.
If the callback is dedicated to adding field display conditions, an input field (Integer, Decimal, Date, Text, or Note) must always be used.
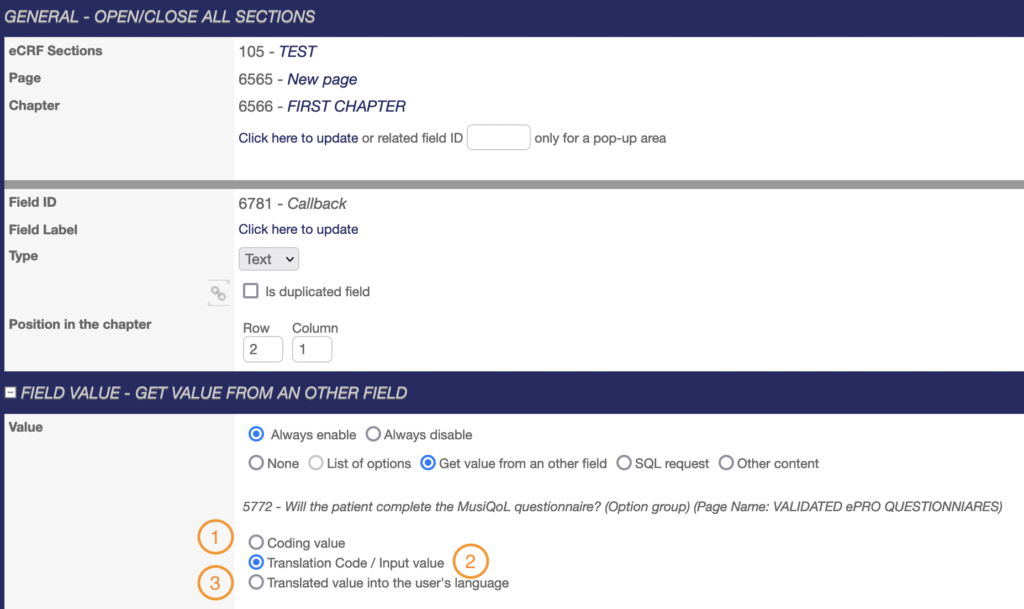
Be careful, there are 3 types of callback available in the system.
It is possible to display only the coding value of an option when the source field is an option group or a drop-down list (1).
It is also possible to display the translation code of an option when the source field is an option group or a drop-down list, or the value entered for all other types of source field (2).
Finally, it is possible to display only the label of an option when the source field is an option group or a drop-down list (3).
“SQL request” can be used when an SQL request needs to auto-calculate the field value each time the page containing the field is opened.
For example, the SQL request to obtain today’s date can be placed in this insert of a Date field if you wish to have the date of the last modifications to an adverse event page in the database.
“Other content” can be used to display a value defined according to that of another field, to display the label of a field as a value, or to display the value of the defined occurrence of a field.
Default value (2)
Here, you can define a default value according to the field type. Please note that a default value is only executed when the page is ready for the first data entry. If the default value is changed after the page has been saved, then the field will always retain the old value.
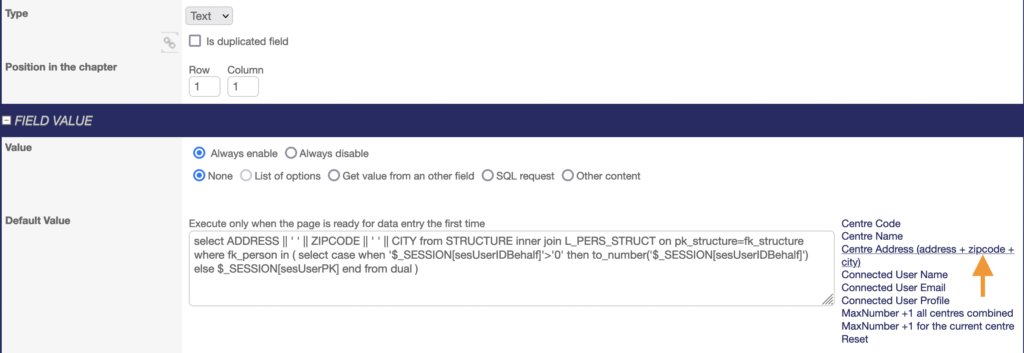
Text fields have default values available in the system. Simply click on one of the items in the list to the right of the insert, and the JS formula will automatically appear in the insert.
- information on the centre of the connected user (code, name, address). Above, the « Centre Address » item has been clicked.
- information on the connected user (username, email and profile);
- information on the maximal number of inclusions in all centres or the current one.
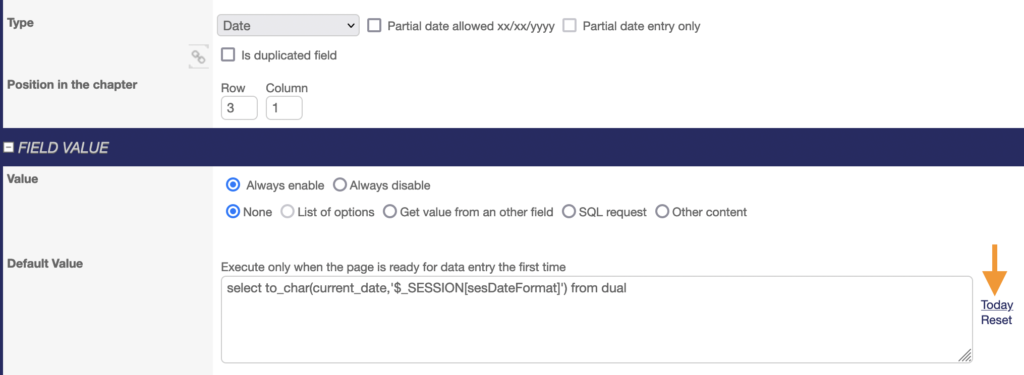
Date fields have today’s date as the default value available in the system. Simply click on the item in the list to the right of the insert, and the JS formula will automatically appear in the insert.
Integer and decimal fields do not have any default values already available in the system. However, the default values for these field types must be numbers.
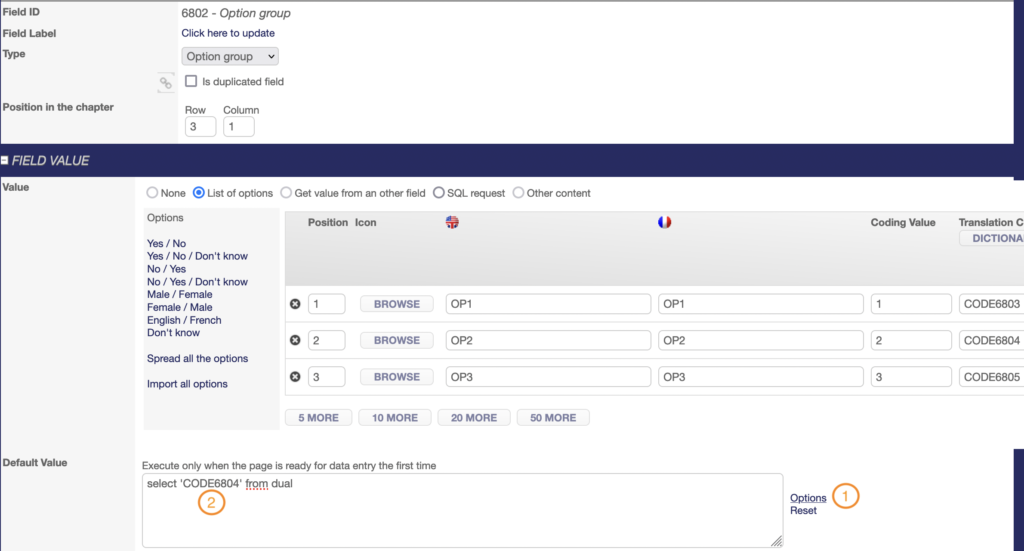
Checkbox fields can be checked as the default value. Simply click on the item in the list to the right of the insert, and the JS formula will automatically appear in the insert.Option group or dropdown list fields can be pre-entered with one of their options as default value. Simply click on the item in the list to the right of the insert, and the JS formula will automatically appear in the insert (1). Then, replace the term TRANSLATIONCODE by the option’s translation code (2).
Value (3)
The “always disable” option allows you to display a value that cannot be modified in FO.
The field appears grayed out. The value will be stored in the database once the page has been saved. Fields set with a value callback must be defined as disabled, such as calculated fields.
Mandatory Value (4)
There are two types of mandatory value, the mandatory blocking type and the mandatory non-blocking type.
Fields with a blocking mandatory value are indicated by a red asterisk in FO.

If a value is of the mandatory blocking type, then it will not be possible to submit the page in which this value is located. A Warning message will appear after you click on the SAVE AND CONTINUE button. It displays the list of mandatory blocking fields with no value in the page. This message will appear until all the values have been entered.
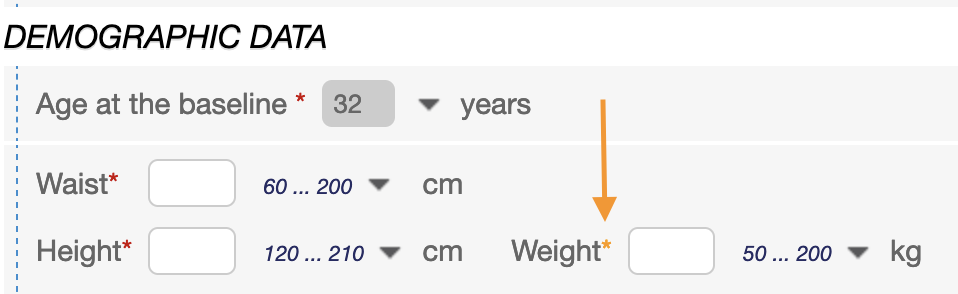
Fields with a non-blocking mandatory value are indicated by a orange asterisk in FO.
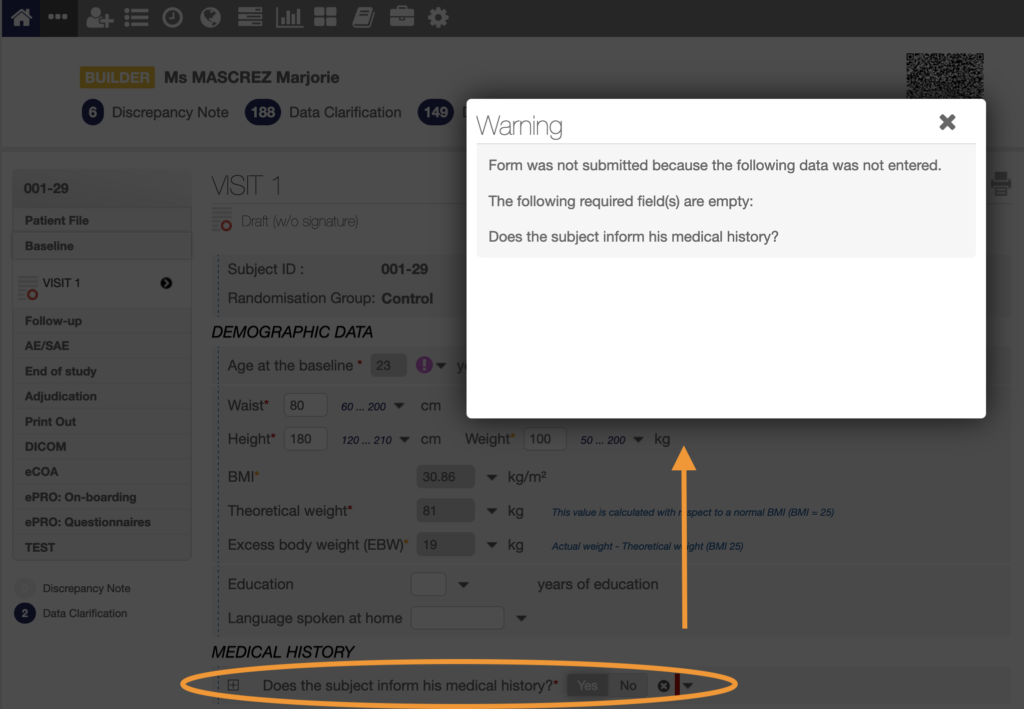
If a value is of the mandatory non-blocking type, then it will be possible to submit the page in which this value is missing. A pop-up window appears after you click on the SAVE AND CONTINUE button of the page, listing all the non-blocking fields with missing values on the page. Two options are then offered: return to the page to enter the missing values (1) or save the page anyway (2).
Bounds Value (5)
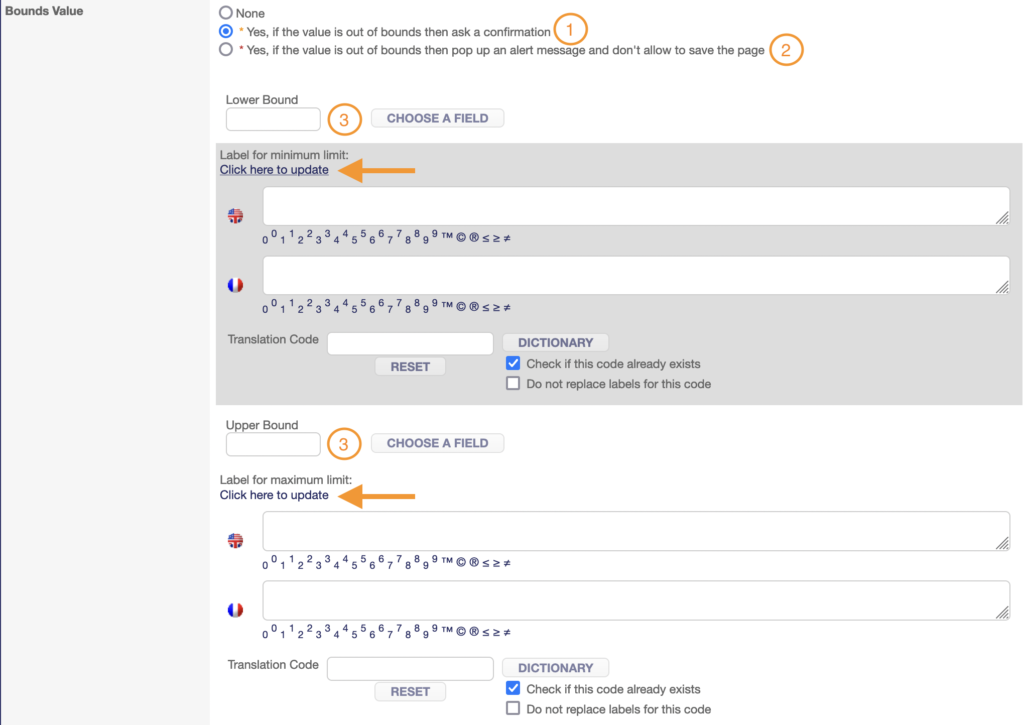
Fields such as integers, decimals, and dates can be bounded to limit the capture of aberrant values. You will need to define a lower bound (3) and an upper bound (3).
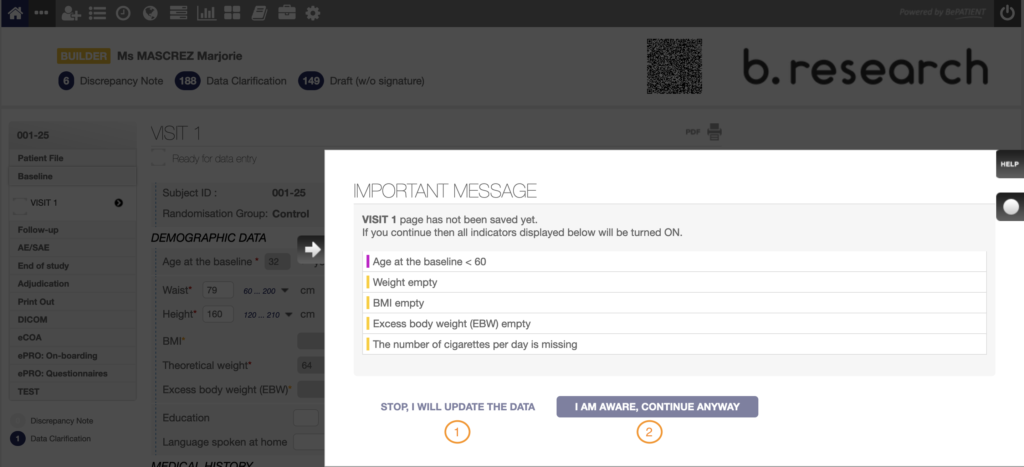
These bounds can be hard mandatory (1), no values outside the bounds will be accepted by the system. These bounds can be soft mandatory (2), values outside the bounds will be tolerated but a pop-up message will be raised after you click on the SAVE AND CONTINUE button of the page.
Labels can be added to the field boundaries; this feature is used for slider fields.
Auto-calculated Value (6)

Here, you can define an auto-calculated value using fields ID (1).
If the current field needs to be set as a simple value callback, the auto-calculated expression will be the id of the source field.
If the value of the current field is calculated from a source field, the auto-calculated expression will be the id of the current field. This applies to theoretical dates calculated from the inclusion date.
If the value is to be calculated when the page is saved only, the auto-calculated expression must contain the calculation. This applies to the patient ID calculated from the centre ID and the centre inclusion number.
In all cases, the « Update automatically the value of this field if the result of this expression has been updated » box (2) should be ticked.
The « Evaluate as mathematical expression » box (3) should be ticked if the field is part of a score calculation or AE ID calculation. This is assessed on a case-by-case basis.
LAYOUT part
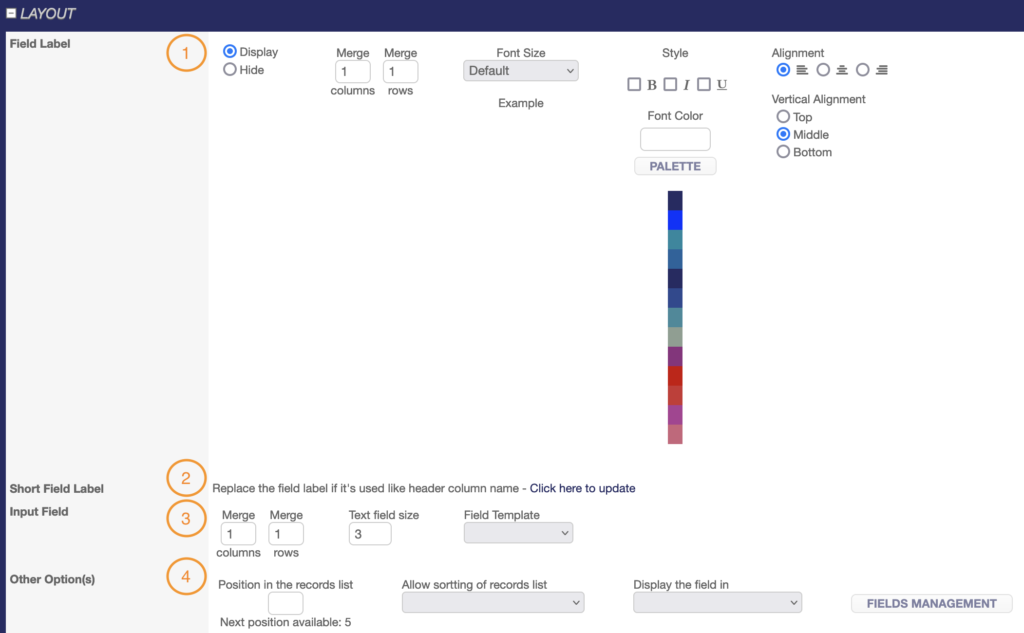
Field Label (1)
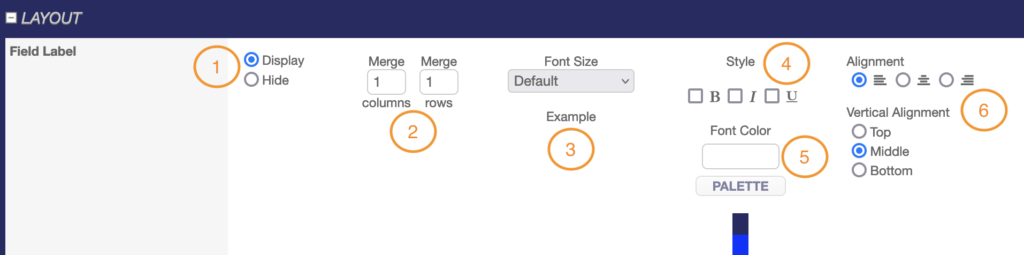
The field label can be displayed or hidden in FO (1).
Pages in SMART are gridded into rows and columns just like an Excel file. It is therefore possible to merge rows and columns for labels that are too long to improve page layout (2).
You can also manage the font size by selecting the option from the drop-down list (3), the style by ticking the appropriate boxes (4) and the font color by selecting the color from the palette or entering the HEX code directly (5).
Finally, you can manage the alignment of the field label vertically (left, centred, right) and horizontally (top, middle, bottom) (6).
Short Field Label (2)
You can define a short label to replace the field label if it’s used like header column name.
Input Field (3)

You can also manage the field input part by merging rows and columns where input part that are too long, to improve page layout (1).
For certain types of field, such as integers, decimals or text fields, it is possible to limit the number of characters to be entered (2).
For integer fields only, you can define a slider model that will only be visible in the ePRO application’s FO (3). Once activated, you can choose to display the graduation and the selected value.
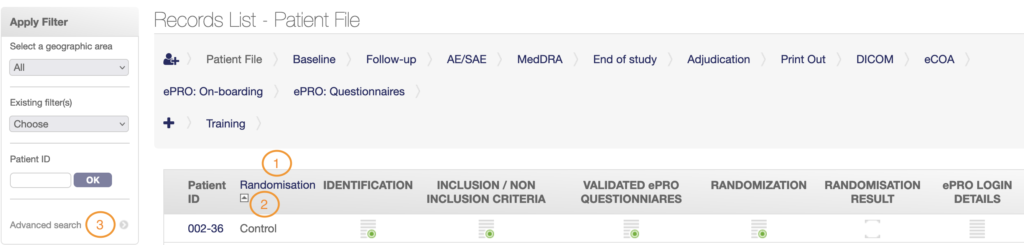
Other Option(s) (4)

You can define the position in the records list to make the field and its value appear in the records list – patient file (1).
Here you can choose to sort the list of records according to the selected values in the current field (2).
Finally, you can also display the current field in the advanced search module (3).
EVENT HANDLERS part
You’ll mainly use the ON CLICK and ON CHANGE blocks to manage events.
The ON CLICK block should be used to handle events in option group and check-box fields.
For the rest of the fields, the ON CHANGE block should be used.
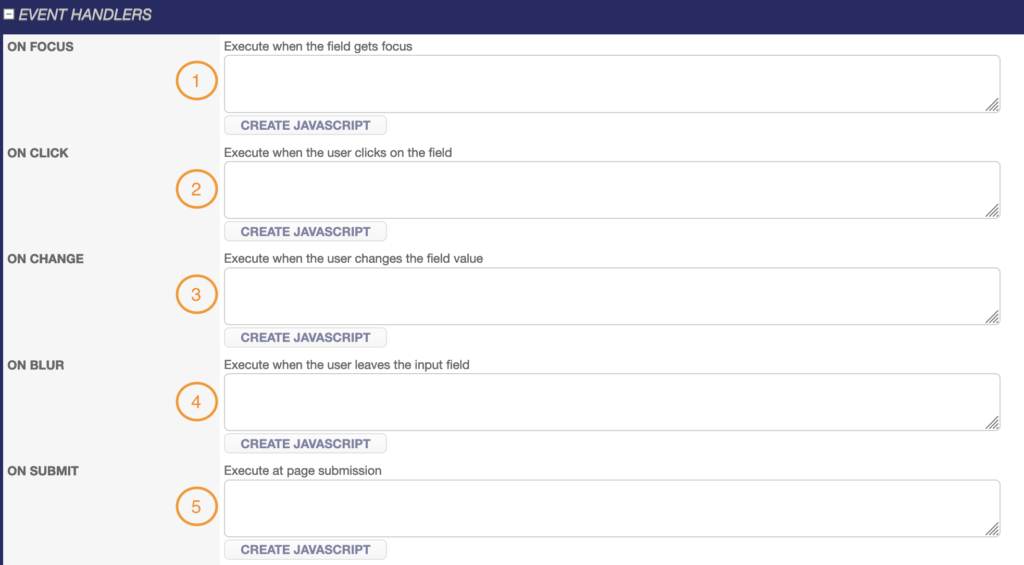
ON FOCUS (1)
JAVASCRIPT are executed when the field gets focus.
ON CLICK (2)
JAVASCRIPT are executed when the user selects an option or ticks the field.
ON CHANGE (3)
JAVASCRIPT are executed when the user changes the field value by entering data.
ON BLUR (4)
JAVASCRIPT are executed when the user clicks out of the field after entering or selecting data.
ON SUBMIT (5)
You can add special conditions to the field through JavaScript you can define in the “Event Handlers” box depending on how you want your field to function.
By clicking on “CREATE JAVASCRIPT”, a configuration module will allow you to easily build your JavaScript step by step through predefined functions. See Add specific JavaScript functions (JS).
ACCESS RIGHT part
Here, you can modify access rights for the current field depending on profiles.
You can choose to hide the current field or make it visible to everyone by ticking « All » (1).
If you wish to differentiate the display according to profile, uncheck « All » then select the profile(s) concerned (2). Please note that any fields hidden from a profile that can export will not be exported.
BRIDGE WITH OTHER TOOLS part
You can define the SAS VAR NAME for a field which can optionally replace labels in exports.
IS RELATED TO part
Here, you can visualise the fields and controls linked to the current field.